
DIY video guides
Hand-picked how-to videos for jobs around the home. Each one comes with what you’ll need, the key steps and when it’s time to call a pro.
DIY Videos
Plumbing, carpentry, gardening, painting and home repairs: watch, learn and decide whether to do it yourself.
 Plumbing
How to Fix a Leaking Tap
A dripping tap wastes thousands of litres a year, and on most older taps the fix is a worn washer that costs a couple of dollars. You'll need: a shifter or spanner, a flat screwdriver, a new tap washer (take the old one to the hardware store to match it) and a cloth. Key steps: 1. Turn off the water at the isolation valve or the mains, then open the tap to drain it. 2. Remove the handle and unscrew the tap body (the jumper valve assembly). 3. Swap the old washer for the new one and check the seat for damage. 4. Reassemble, turn the water back on and test. When to call a pro: if the tap still drips after a new washer, the seat is worn or the tap is a ceramic-disc or mixer type that needs a cartridge. A plumber can reseat or replace it quickly.
Video by Curran Plumbing
 Plumbing
How to Unclog a Sink Without Chemicals
Most slow or blocked sinks are caused by hair, grease or food trapped in the trap under the sink, and you can usually clear them without harsh drain cleaners. You'll need: a plunger, a bucket, gloves, an old towel and, if needed, a cheap plastic drain snake. Key steps: 1. Remove the plug or stopper and clear any visible gunk. 2. Plunge firmly with a little water in the sink, covering the overflow hole. 3. If that doesn't work, put a bucket under the trap, unscrew it and clean it out. 4. Reassemble hand-tight and run hot water to check for leaks. When to call a pro: if several drains are slow at once, water backs up into other fixtures, or there's a bad smell outside, the blockage is further down the line and needs a plumber with a drain camera or jetter.
Video by How To Home
 Plumbing
How to Fix a Running Toilet
A toilet that keeps running or refilling is usually down to one of two parts inside the cistern: the flush valve seal or the fill (inlet) valve. You'll need: replacement parts for your cistern model (many hardware stores sell universal kits), a sponge and a towel. Key steps: 1. Take the lid off and watch a flush to see where water is escaping. 2. If water trickles into the bowl, the flush valve washer is leaking: replace the seal. 3. If the water level rises into the overflow, adjust or replace the fill valve. 4. Turn the water back on, flush a few times and check it stops cleanly. When to call a pro: concealed (in-wall) cisterns, cracked cisterns, or leaks at the base of the toilet are jobs for a licensed plumber.
Video by JENSEN DIY
 Electrical basics
How to Reset a Safety Switch (RCD) on Your Switchboard
When the power suddenly goes off in part of the house, a safety switch (RCD) has usually tripped to protect you. Resetting it is safe and something every homeowner should know how to do. Key steps: 1. Open the switchboard and find the switch that is in the down or off position. 2. Unplug appliances on the affected circuits, then push the switch back up. 3. If it holds, plug appliances back in one at a time to find the one that trips it. 4. Leave the faulty appliance unplugged until it has been checked. Safety first: never open the switchboard cover or touch wiring. If the switch trips again straight away with nothing plugged in, or you see burning marks or smell burning, stop and call a licensed electrician. In Australia, New Zealand and most countries, electrical work beyond resetting switches and changing bulbs must be done by a licensed electrician.
Video by Justin Morris
 Electrical basics
How to Replace Smoke Alarm Batteries
Working smoke alarms save lives, and a chirping alarm is telling you its battery is low. Test your alarms monthly and replace batteries yearly, or when they chirp. You'll need: the right battery (usually 9V), a stable step ladder and a cloth to dust the alarm. Key steps: 1. Twist or slide the alarm off its base, or open the battery door. 2. Swap in the new battery, matching the + and − markings. 3. Clean dust from the vents and refit the alarm. 4. Press the test button until it sounds. When to call a pro: alarms older than 10 years should be replaced. Hard-wired (240V) alarms, and the interconnected alarms now required in many rental properties, must be installed or replaced by a licensed electrician.
Video by Bunnings Warehouse
 Carpentry
How to Fix a Squeaky Door
A squeaky door is almost always a dry or dirty hinge pin, and you can quiet it in a few minutes. You'll need: a hammer, a nail or nail punch, steel wool, and a lubricant such as white lithium grease or silicone spray. Key steps: 1. Close the door, then tap the hinge pin up and out from underneath, one hinge at a time. 2. Clean the pin with steel wool to remove rust and old grime. 3. Coat it lightly with lubricant and tap it back in. 4. Open and close the door a few times and wipe away any excess. When to call a pro: if the door drags, won't latch, or the hinges have pulled out of the frame, a carpenter or handyman can re-hang it or repair the jamb.
Video by This Old House
 Carpentry
How to Install Floating Shelves
Floating shelves look clean and modern, but they only hold weight if they're fixed into studs or with the right wall anchors. You'll need: a stud finder, a spirit level, a drill and bits, a pencil, the shelf's hidden bracket and suitable screws or plasterboard anchors. Key steps: 1. Find the studs and mark the shelf height with a level line. 2. Hold the bracket on the line and mark the fixing holes. 3. Drill and fix the bracket, into studs where possible. 4. Slide the shelf over the bracket and secure it with the grub screws. When to call a pro: for heavy loads, tiled walls, or walls that may have pipes or cables behind them, a handyman or carpenter will fix it safely.
Video by Bunnings Warehouse
 Carpentry
How to Fix a Sticking Door
Doors often stick after wet weather or as a house settles. Before you reach for a plane, check the simple fixes first. You'll need: a screwdriver, longer screws, a pencil and, if needed, a hand plane or sanding block and paint to reseal. Key steps: 1. Close the door slowly and mark where it rubs. 2. Tighten all hinge screws; replace a loose top-hinge screw with a longer one that reaches the frame. 3. If it still rubs, lightly sand or plane the marked edge. 4. Seal any bare timber with paint so it doesn't swell again. When to call a pro: large gaps or cracks around the frame can point to movement in the house. A carpenter (or a building inspector for big cracks) can check what's causing it.
Video by MrFixItDIY
 Gardening
How to Build a Raised Garden Bed
A raised garden bed gives you better soil, fewer weeds and an easier back, and it's a great weekend project. You'll need: treated pine or hardwood sleepers (or a kit), galvanised screws or brackets, a drill, a spirit level, a spade, and a mix of garden soil and compost. Key steps: 1. Pick a sunny, level spot and mark out the bed. 2. Fix the sleepers together at the corners and check it's level. 3. Line the base with cardboard to smother grass, then fill with soil and compost. 4. Water well and plant. When to call a pro: for bigger landscaping, retaining walls, or beds on a slope, a landscaper can design and build it to last.
Video by Bunnings Warehouse
 Gardening
How to Lay a New Lawn from Turf
Fresh turf gives you an instant lawn. Good preparation is what makes it take root and stay green. You'll need: turf (order about 5% extra), turf underlay soil, a rake, a lawn roller, a sharp spade or knife, and a hose or sprinkler. Key steps: 1. Remove old grass and weeds, then level the area and spread underlay soil. 2. Lay the first row along a straight edge, then stagger the joins like brickwork. 3. Roll the turf so the roots touch the soil. 4. Water deeply straight away, then daily for the first couple of weeks. When to call a pro: large areas, poor drainage or major levelling are quicker and better done by a landscaper or turf supplier who installs.
Video by Gardening Australia
 Gardening
How to Prune Roses
Pruning in late winter keeps roses healthy and gives you more flowers in spring. You'll need: sharp, clean secateurs, a pruning saw for thick canes, and thick gardening gloves. Key steps: 1. Remove dead, damaged and crossing canes first. 2. Cut the remaining canes back by about a third to a half. 3. Make each cut on an angle just above an outward-facing bud. 4. Clear away the cuttings and old leaves, then mulch and feed. When to call a pro: for large gardens or overgrown shrubs and hedges, a gardener can prune everything at the right time of year.
Video by Bunnings Warehouse
 Painting
How to Paint a Wall
Painting a room is one of the cheapest ways to refresh a home, and preparation is most of the job. You'll need: paint, a roller and tray, a cutting-in brush, painter's tape, drop sheets, filler, sandpaper and sugar soap. Key steps: 1. Move furniture, cover the floor and wash the walls with sugar soap. 2. Fill holes, sand smooth and tape edges and trims. 3. Cut in around edges with a brush, then roll the walls in even sections. 4. Let it dry, then apply a second coat. When to call a pro: high ceilings, stairwells, lead paint in older homes, or exterior painting are worth handing to a professional painter.
Video by Bunnings Warehouse
 Painting
How to Patch a Plaster Wall
Small holes and dents in plasterboard are easy to repair so they disappear under a coat of paint. You'll need: a patch kit or plaster mesh, ready-mixed filler, a filling knife, fine sandpaper and primer. Key steps: 1. Trim any loose paper or plaster around the hole. 2. Cover larger holes with a self-adhesive mesh patch. 3. Apply thin coats of filler, feathering the edges and letting each coat dry. 4. Sand smooth, prime and paint. When to call a pro: water stains, sagging ceilings or holes bigger than a hand need a plasterer, and possibly a plumber or roofer to fix the cause first.
Video by Bunnings Warehouse
 Tiling
How to Regrout Bathroom Tiles
Fresh grout makes a tired bathroom look new and helps keep water out of the walls behind the tiles. You'll need: a grout saw or rake, grout to match your tile spacing, a rubber float, a sponge and bucket, and grout sealer. Key steps: 1. Rake out the old grout carefully without chipping the tiles. 2. Vacuum the joints and wipe them clean. 3. Press new grout into the joints diagonally with the float. 4. Sponge off the excess, let it cure, then seal. When to call a pro: loose or drummy tiles, leaks into the room next door, or failed waterproofing need a tiler or waterproofer, not just new grout.
Video by The Block
 Tiling
How to Replace a Broken Floor Tile
A cracked tile can be swapped out on its own, without retiling the whole floor, if you have a matching spare. You'll need: a matching tile, a grout rake, a hammer and cold chisel, safety glasses, tile adhesive, a notched trowel and grout. Key steps: 1. Rake out the grout around the broken tile. 2. Break it up from the centre outwards and remove the pieces and old adhesive. 3. Spread fresh adhesive, press the new tile in and check it's level. 4. Grout once the adhesive has set. When to call a pro: several cracked tiles in one area can mean a moving or damp floor underneath. A tiler can find the cause before replacing them.
Video by Bunnings Warehouse
 Cleaning
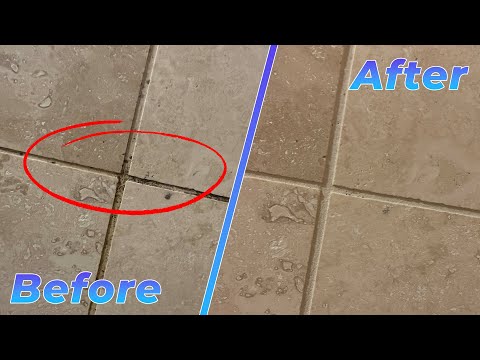
How to Clean Shower Grout and Mould
Dark grout is usually soap scum and mould, and regular cleaning keeps it from coming back. You'll need: a stiff grout brush or old toothbrush, gloves, a cleaner suited to your tiles, a spray bottle and good ventilation. Key steps: 1. Rinse the area and apply the cleaner to the grout lines. 2. Leave it for a few minutes, then scrub along the joints. 3. Rinse thoroughly and dry the area. 4. Seal the grout once it's dry, and run the exhaust fan after every shower. When to call a pro: mould that returns quickly, or that spreads to walls and ceilings, can point to a leak or poor ventilation. A cleaner, plumber or waterproofer can help.
Video by Cleaning How To
 Cleaning
How to Clean Your Oven with Baking Soda and Vinegar
You can clean a greasy oven without harsh fumes using two pantry staples and a bit of patience. You'll need: baking soda, white vinegar, water, a spray bottle, a plastic scraper, gloves and cloths. Key steps: 1. Take out the racks and soak them in hot soapy water. 2. Spread a paste of baking soda and water over the inside, avoiding the elements. 3. Leave it overnight, then scrape and wipe off the paste. 4. Spray vinegar on any residue, wipe clean and refit the racks. When to call a pro: for a deep clean before an end-of-lease inspection, a professional cleaner can do the oven, rangehood and cooktop in one visit.
Video by Home Insider
 Home repairs
How to Fix a Squeaky Floor
Squeaky floorboards happen when boards rub against each other or the nails holding them down. Most can be quietened from above. You'll need: a stud or joist finder, trim-head screws or a squeak repair kit, a drill, and wood filler or touch-up crayons. Key steps: 1. Walk the floor to find exactly where it squeaks. 2. Locate the joist under the noisy board. 3. Drive a screw through the board into the joist to pull it tight. 4. Fill and touch up the screw head. When to call a pro: bouncy, sagging or sloping floors can mean problems with the frame or stumps underneath. A builder or building inspector should take a look.
Video by This Old House
 Home repairs
How to Stop a Dripping Shower Head
A shower that keeps dripping after you turn it off is usually a worn washer or cartridge in the tap, not the shower head itself. You'll need: a shifter, screwdrivers, plumber's tape and the right replacement washer or cartridge for your tapware. Key steps: 1. Turn off the water to the bathroom or the whole house. 2. Remove the tap handle and cover plate. 3. Unscrew the tap body and replace the washer or cartridge. 4. Reassemble, turn the water on and check for drips. When to call a pro: if the taps are behind tiles and you can't isolate the water, or the drip continues, a plumber can replace the parts without damaging the wall.
Video by Anytime Plumbing
 Home repairs
How to Replace Flyscreen Mesh
A torn flyscreen lets insects in, but re-meshing the frame is cheap and takes about half an hour. You'll need: flyscreen mesh, a spline (rubber cord) to match your frame, a spline roller, a utility knife and a flat screwdriver. Key steps: 1. Lift out the screen and remove the old spline and mesh. 2. Lay the new mesh over the frame, leaving a little extra on all sides. 3. Roll the spline into the channel, keeping the mesh tight and straight. 4. Trim the excess mesh and refit the screen. When to call a pro: bent frames, security or pet-proof screens, and doors that won't slide are quicker to have a screen repairer or handyman fix.
Video by Bunnings Warehouse